Intro
With the craze of microservices having a continuous integration pipeline with your favorite
A big part of having a CI pipeline in place is automated tests, which includes regression tests for your UI component.
TLDR
Add unique identifiers to the elements you wish to interact with inside of your tests either using the html attribute “id” or your own attribute/combination of attributes. Then have very simple locators of
//*[@id=the_unique_identifier]

or

//*[@attribute1=part_of_unique_identifier and @attribute2=other_part_of_unique_identifier]
XPath
So what exactly is XPath? Well as defined the XPath website itself, “XPath is a language for addressing parts of an XML document, designed to be used by both XSLT and XPointer.”
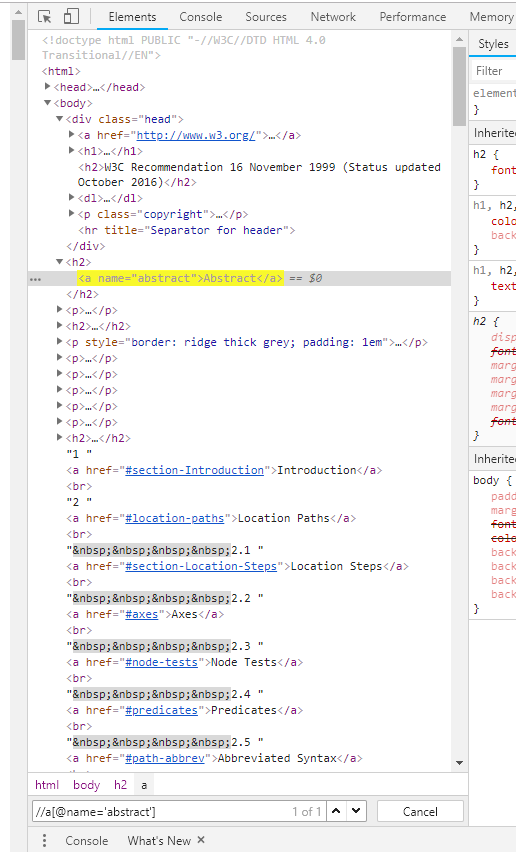
To try out the following selectors or to test out your own try this test bed
Or if you want to try out/test xpath selectors directly on a website open up your dev tools (f12) in chrome and test them out.
Another useful tip is a pages DOM structure will often change upon hovering/moving the mouse around, to get around this you can temporarily disable the javascript on a page by hitting F1 and disabling javascript.
Examples
Intro
Many XPath expressions resemble that of traversing your favorite Unix filesystem ie cd / navigates you to the root direction / as a XPath expression returns the root element.
Lets start off with this simple html block:
<body>
	<div>
		<span>
			<p>
				<strong>
					XPath is awesome!
				</strong>
			</p>
		</span>
	</div>
</body>
Here the expression / would return the entire html block while /body/div/span/p would return <p><strong>XPath is awesome!</strong></p>.
Similarly /body/div/span/p/strong would return <strong>XPath is awesome!</strong>.
Writing the entire path to an element can get tedious for that we can use // vs /. The difference between the two is / is for absolute paths while // is for relative paths. For example /body/strong will only match with elements which are strong and the direct child of a body tag, in this case it will match with nothing. However /body//strong will return <strong>XPath is awesome!</strong>.
You may have noticed all the expressions so far have started off with /body as you can probably figure out this means we are looking for a body top level element, and could use //body.
Attributes
This time will use the following html block:
<body>
	<div id='Article'>
		<div id='Title' class='Bold Highlighted Box'>
			Lorem Ipsum
		</div>
		<div id='Content'>
			Lorem ipsum dolor sit amet, consectetur adipiscing elit. Duis et interdum ipsum.
		</div>
		<div id='Footer'>
			Lorem ipsum dolor sit amet, consectetur adipiscing elit. Duis et interdum ipsum.
		</div>
	</div>
</body>
Lets get the div with an id of Title for that the following expression will work //div[@id='Title'] pretty simple right? Also goes to show you how useful giving elements a unique tag will be for testing.
XPath selectors work for all types of attributes //div[@class='Bold Highlighted Box'] will also return the title div.
Now what if we dont know the full value of the attribute, here we can use starts-with and ends-with. For example lets say we want to select all elements that have a class ending with Box we could use the following selector //div[ends-with(@class, 'Box')].
Unfortunately XPath does not have a great way of checking if part of a space separated list equals to something else so the following hack could be used //div[contains(concat(' ', normalize-space(@class), ' '), ' expected-class ')]. This is very useful for doing a class check.
Operators
So far all our queries have been using the standard = operator but as in most programming languages XPath has access to many other operators such as !=, >, >=, <=, and, or, not.
For example
<body>
	<div role='row'>
		<div role='product' class='unselected' price='25'>
			Toothbrush
		</div>
		<div role='product' class='unselected' price='25'>
			Haircomb
		</div>
		<div role='product' class='unselected' price='10'>
			Flour
		</div>
		<div role='promotion' class='unselected' price='25'>
			Rice
		</div>
	</div>
</body>
Now lets get all the divs that are products, are unselected by the user and cost more than 20$, //div[@role='product' and @class='unselected' and @price > 20]. This will return both the toothbrush div and the haircomb div.
Axes (Parents/children)
So far we have been creating selectors that pick children of an element, ie /body/div/span we are selecting spans that are inside of divs which are insides of bodies. But what about getting ancestors or siblings?
For those cases one can use the various built in axes such as descendant-or-self or following-sibling.
Using the following html as our example
<body>
	<div>
		<span>
			Hello
		</span>
	</div>
</body>
Now lets get the first div ancestor of the span containing Hello //span[contains(text(),'Hello')]/ancestor-or-self::div.
Cheatsheet
Heres a great cheatsheet with a few more sample querys.